 Pin to board
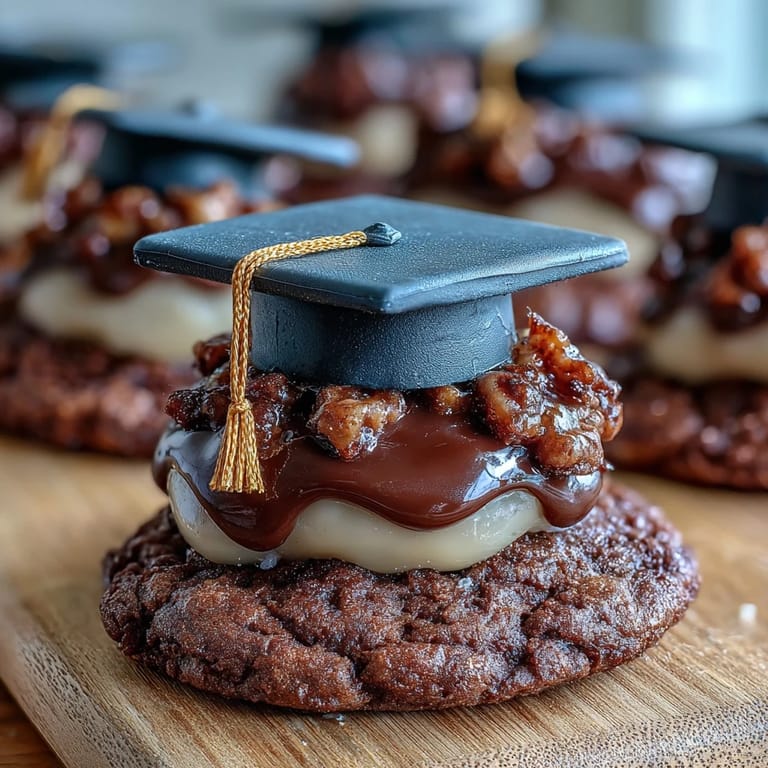
 Last spring, my niece asked if I could make something special for her graduation party, and I found myself staring at a blank kitchen counter wondering how to turn sugar cookies into tiny celebration hats. The fondant mortarboard idea came to me while scrolling through old photos of my own graduation day, and suddenly I was rolling black fondant at midnight like some kind of sugar cookie architect. What started as a simple request became one of those kitchen projects that feels fiddly in the moment but absolutely worth it when you see them lined up on a platter looking like edible accomplishments.
I'll never forget watching my sister's face light up when she saw the cookie display at the party—she actually gasped, which is not a reaction I get often in the kitchen. Someone asked if I'd ordered them from a bakery, and hearing my sister say no, my niece's aunt made them by hand, was honestly better than any compliment. That's when I realized these cookies had crossed from being dessert into being a memory, which is really what food should do at celebrations.
Ingredients
- All-purpose flour: The foundation of everything—I learned to weigh it rather than scoop because it prevents dense cookies that won't hold decorations well.
- Unsalted butter: Softened to room temperature is non-negotiable here, or your dough becomes a wrestling match.
- Granulated sugar: Creates that perfect tender crumb that fondant sits on without cracking.
- Egg and vanilla extract: These bind everything together and give the cookies their subtle sweetness that doesn't fight with the fondant.
- Black fondant: The star of the show—I always buy it pre-colored because making fondant from scratch is a rabbit hole I don't recommend on a timeline.
- Yellow fondant: For the tassel detail that actually makes people say wow, even though it's just a tiny rolled piece.
- Powdered sugar and milk: Your edible glue and the thing that holds this entire operation together.
Tired of Takeout? 🥡
Get 10 meals you can make faster than delivery arrives. Seriously.
One email. No spam. Unsubscribe anytime.
Instructions
- Start with a warm oven and organized workspace:
- Preheat to 350°F and line your sheets with parchment while you gather all your ingredients—this moment of preparation saves frustration later. I learned this the hard way when I realized mid-baking that I was out of vanilla.
- Whisk your dry ingredients together:
- Combine flour, baking powder, and salt in a medium bowl, breaking up any lumps in the flour so everything bakes evenly. This takes maybe two minutes and makes such a difference in texture.
- Cream your butter and sugar until clouds form:
- Beat them for two to three minutes until the mixture goes pale and fluffy—this is where air gets trapped and makes cookies tender instead of dense. You'll hear the mixer work harder at first, then it gets quieter as everything becomes light.
- Bring the wet mixture together:
- Beat in the egg and vanilla, scraping down the sides so nothing hides at the bottom. The mixture should look smooth and smell incredible at this point.
- Fold in your dry ingredients gently:
- Add the flour mixture gradually and mix just until you don't see white streaks anymore—overworking develops gluten and makes cookies tough. Stop while it still feels like you could stir a bit more, and you'll be perfect.
- Roll and cut with confidence:
- Turn dough out onto a lightly floured surface and roll to about a quarter inch thick, then cut into two-and-a-half-inch rounds or squares. I like squares because the mortarboard sits more naturally on a flat surface.
- Bake until the edges whisper they're done:
- Bake for ten to twelve minutes—you want the edges just barely golden while the centers still look almost soft. They continue cooking on the pan after you remove them, so pull them out a touch early.
- Cool completely before decorating:
- Let cookies rest on a wire rack until they're at room temperature, which takes about thirty minutes and is actually the hardest part because you want to start decorating immediately. I use this time to shape my fondant pieces so I'm not rushing later.
- Shape your fondant mortarboards while cookies cool:
- Roll black fondant thin, cut small squares for the tops, and roll tiny cylinders for the bases—these pieces are deceptively simple but look polished. Dust your work surface with cornstarch so nothing sticks and tears.
- Make your yellow tassels with intention:
- Roll yellow fondant into thin ropes, cut them into inch-long pieces, and shape them so they actually look like tassels instead of random bits. Curve them slightly so they hang naturally from the mortarboard corner.
- Mix your icing to the right consistency:
- Combine powdered sugar, milk, and vanilla until it's smooth but thick enough to hold decorations—you want it like wet sand, not peanut butter. If it's too thin, your mortarboards slide around.
- Assemble with an artist's patience:
- Place a small dab of icing in the center of each cookie, press the fondant square on top, position the cylinder underneath it, and secure the tassel with another tiny dab. Stand back and admire each one because you've earned it.
- Let everything set before wrapping:
- Give the icing twenty to thirty minutes to firm up so your decorations don't shift when you package them. This is the final stretch and worth the wait.
 Pin to board
 There's a quiet magic in making something decorative by hand that everyone can eat—it bridges the gap between art project and dessert in a way that feels special. These cookies became the most talked-about thing at a graduation party, which says everything about how much effort people notice when it comes from genuine care.
Customizing for School Colors
One of my favorite parts of this recipe is that you can match any school's colors, which turns these from generic cookies into genuinely personalized gifts. I once made them in purple and gold for a friend's daughter, and seeing the mortarboards echo her school colors made the whole thing feel tailored just for her. Most cake decorating stores sell fondant in every color you could imagine, or you can knead food coloring into white fondant if you're feeling experimental.
Making These Ahead of Time
These cookies actually improve your life when you make them a day or two before your event because you get to bake them early and decorate them whenever you find a free hour. I once assembled them while my friend told me graduation stories, which somehow made the whole process feel less like work and more like celebration. The cookies keep beautifully in an airtight container, and the fondant decorations actually firm up more as they sit.
Troubleshooting Moments You Might Have
If your fondant cracks while you're rolling it, just warm it gently between your hands for a few seconds and try again—it responds to patience like a cranky toddler. If your cookies spread too thin in the oven, your butter was probably too warm or you didn't chill the dough; next time, chill your shaped cookies for fifteen minutes before baking. If your icing looks too thick, add milk one tiny drop at a time until it reaches that perfect consistency where it flows slightly but holds its shape.
- Always keep extra fondant on hand because you'll inevitably want to make a few backup mortarboards.
- Taste a plain cookie before you frost to make sure your proportions are right—it should be sweet but not overwhelming.
- Keep cornstarch nearby while working with fondant because even small amounts prevent sticking that ruins your decorations.
 Pin to board
 Making these cookies feels like throwing a small celebration every time someone opens a box of them, which is exactly what graduation deserves. Your graduate will taste the butter and vanilla and love, and that's the whole point.
Recipe Questions & Answers
- → What flour type is best for these cookies?
All-purpose flour provides the right balance, ensuring a soft yet sturdy texture that holds the fondant decoration well.
- → How do I prevent fondant from sticking during decoration?
Lightly dust the rolling surface with cornstarch to keep the fondant smooth and manageable while cutting shapes.
- → Can these cookies be made ahead of time?
Yes, store the decorated cookies in an airtight container for up to 5 days to maintain freshness and firmness.
- → What’s the ideal thickness for rolling out the cookie dough?
Roll the dough to approximately 1/4 inch thickness for an even bake and a firm base to support decorations.
- → How do I achieve vibrant fondant tassels?
Use colored fondant or add food coloring to white fondant, then roll into thin ropes before cutting for tassel shapes.